Showing posts with label studio tour. Show all posts

Sunday, October 2, 2016

My studio

We bought this house in December of 2015, and had some updating done. Part of this included closing in a screened porch for my studio/office. While it is a work in progress, I am working in it daily. The first challenge was creating a design wall.

The wall itself is brick. (I'm not fond of the the raw red color, that will eventually change.) So hanging a design wall took some research.


The ingredients: styrofoam insulation boards (easy for me to handle):


white duct tape

  
outdoor tape

505 spray

(not pictured)batting scraps.
I sprayed the batting with 505, laid the styrofoam on top, flipped over and smoothed out. Then flipped back over and used the duct tape to secure the batting edges.

Then added the outdoor tape.

I leveled using the mortar lines and hung the panels.
I hung this in April, it is now the end of September and it is still hanging well. 
The outdoor tape is amazing!

Sunday, April 12, 2015

So we moved...

So we moved, 94.5 and an hour and a half away. From a new-ish house with ample storage to a smaller, older, house without. This is a rental, very dog-friendly, in a GREAT neighborhood. We can walk to the local park which has an off-leash area for dogs. The neighbors are amazing, I already feel as if we have made life-long friends! The drawback? Trying to cram my sewing/quilting studio equipment into a 10' by 11' room.

I went from this:

to this:

to this:
The tiny room was designed to be a bedroom. I grew up in a room just like this. It was perfect as a child. But for a quilting space it has been challenging. I had a mini-melt-down earlier in the week, which considering the situation was really good. I do have space for a design wall. But books, notions and backing fabrics haven't yet made it in here. Probably won't.

We are renting, since we do not know the area, and fully intend to look for an appropriate place to buy once our other house sells, so I know this is temporary. In the interest of maintaining my sanity, I have made it work and yesterday whipped up this pillow:
It is for a fund-raiser at work. Just half-square triangles, but it feels good to be making again.


Wednesday, November 28, 2012

sweatshop tour, continued

I know you are riveted and excited to see more of my own little haven! Truly I may not have gorgeous, coordinated furnishings, but it is my haven and I love it!

The roof line and north-facing window mean the light is not the best. My husband and I painted the room bright white last winter to maximize the light. It was a taupey-gold color, which is grat for the rest of the house, but it meant this room had weird shadows and colors had a strange cast.

Under the right eave is the desk. This desk was built by my husband's grandfather and it has moved with us everywhere we have lived.


Here is a close up of the beauties at my desk.

The lovely art quilt was a gift from my friend Laura. She dyed the fabric and FMQ-ed it. It was a total surprise and I love it! The pillow was from our TMQG swap, made for me by my friend Colleen. I adore it! There is a small Ganesha that my dear friend/colleague Keshore brought to me from his home in India, next to that is a small picture of me in my Daddy's arms one Easter when I was a little girl. I am so inspired and comforted to be surrounded by the items of beauty!

In the other eave is my sewing/quilting station. I have my Sapphire on an Arrow Gidget II table, with an additional table behind and on the left side to hold mt quilts as I FMQ. This allows my machine to be recessed, with the needle approximately the same height as my table(s). This makes a huge difference in comfort while quilting!
I also set up my Feather weight on the left table to piece. I have a floor light from IKEA on the right of the machine, I like the brightness, but the light is a bit yellow. On the left side I have an Ott light I bought a few years ago at Lowes. It was a good deal and I wish I had bought 2! But alas, they did not restock them after the sold them.

On the wall behind you can see 2 gorgeous mini-quilts I received in swaps. The Swoon block was from my friend Sarah and she used my favorite blue/orange combination. The other mini was from the DS swap I was in this past summer. Gabriella did a beautiful job embroidering the quilting lady in the center block! The rolling drawer cabinet I lucked into at Big Lots a few years ago (Cheap #3). So handy, and it rolls anywhere I need it.

Beside the machine tables is another set of bookcases (I have 4 medium bookshelves from Target, $19 each, Cheap #4). The top has my antique spool holder (also made by my husband's grandfather) which hold my collection of wooden spools. I have my antique wooden yarn spools along with my button jars on that as well.

These shelves hold my dying supplies, scrapbook stuff, books and patterns. I found several pattern I had forgotten about, so they are on my list to use in the near future!

This picture looks sad. But it also looks like room to add more books! And I love quilting/craft/art books! The binders on the bottom shelf hold patterns and inspiration from magazines and the net. I love storing them this way, the only problem is that since I can't instantly see them, I forget they are there! Another good reason to take time for sorting/organizing.

 To finish up, I will leave you with this shot of my little pre-cuts basket. And you can see my battings in the corner.
I hope you have enjoyed this little tour!

Seriously, every person who enjoys creating, needs a room of their own to dedicate to their creative activities. I am glad I cleaned it up, but it is so liberating to be able to leave a project out while in process. I have run the gamut from sewing on the kitchen table, to taking the tiny bedroom, to this space. And my art/quilting is worth it!

Monday, November 26, 2012

Sweatshop tour, part 1

I spent part of the long weekend doing some long-awaited cleaning/sorting/organizing in my sweatshop. No, no "before" pictures! I do admire the gorgeous "done" studios I have seen, but I have opted for practical and thrifty for the time being.

Here is the view from the door:
 My sweatshop/studio is the "bonus" room over our garage. Great square footage, and while I love the roof-line ceiling, it makes arranging a bit of a challenge. Cheap #1: My Dad took our old kitchen table and added longer legs (and a shelf) to make my cutting table. Amazing how the extra height really makes a difference to my back.

On the right side of the door, is my design wall. Cheap #2: It is made of white flannel, which I pieced and tacked to the wall.
 The left side of the door: this corner features some neat artwork, a Scherenschnitte (cut paper) of a quilter, which was a gift from a friend; a cross stitch piece of a quilt that I purchased at a charity auction; and my autographed Heather Ross print.


Close up of the cute print:

Under the artwork is a short shelf: I keep my templates in a file holder on the top. I have my fat-quarters on this shelf, solids together, prints & batiks together, all arranged in ROY G. BIV color order. Besides being a very fun and therapeutic activity, this also shows me that I am drawn to the red and orange color families, with very few greens.
 Around the corner on a taller shelf are my yardage cuts on the second shelf, with projects bundled together on the top shelf.
This is it for my stash. I have seen much larger stashes (hoards!) but I have really tried to keep the buying to a minimum. I like having projects sorted and bundled together, makes it easy to move to the next one and gives me a new project to look forward to. Stay tuned for the next part (if you dare...)


Sunday, January 23, 2011

Resting & Nesting

We have had a crazy busy week followed by a teaching Saturday, so I have been trying to recuperate and recharge today. I had 10 fabulous, wonderful ladies in my FMQ beginners class yesterday. They were attentive, supportive and willing. I had a great time! Then I took my mom to a late lunch and dropped by to help my dad with some computer questions. A good day. Today, instead of sewing, I decided it was time to get the sewing studio in shape.

Remember the before?

Here's the after:


I got my wall rack that my son made up on the wall. On it I have tops ready to quilt.


The other side of the window I put new shelves and got my batting and fabric stash out of bags and off the floor:


Ready to get back to sewing!

In our living space, we hung "Wildfire". I love it!


Friday, August 6, 2010

My Deal! (or should I say steal?)

While out for my noon walk in the horrendous heat yesterday, my friend I passed a little antique shop we pass every day. This day, a modern piece catches our eyes. I snatched the object without any bargaining. What did I score?

Well it has this little logo stamped on the back:


Look at what I got!

A Herman Miller Aeron Chair!!!

The price, you ask.

You are not going to believe it. 


Seriously.


This is my new sewing chair. Granted the arms are missing, but I would have taken them off anyway.


Oh, yeah, the price.


$29.25.  Yes, that is twenty-nine dollars and twenty-five cents.  


It is so comfy. LOVE.

Saturday, February 27, 2010

My Studio (AKA the sweatshop)

I am sharing my studio today for 2 reasons: 1. It is as clean as it gets since the house is being shown and 2. Since the house is being shown I need something to do that keeps me out of there! 

Come on in! This is the view from the hall. I love days like this when the sunlight streams in.

As you step in, you see my minimal sheving where I keep my stash of books, magazines and fabrics.

We took up the carpet and had all the wood floors redone about 4 years ago. I love the floors!

My ironing board sits under 2 of my inspiration/cork boards. I really like being able to leave the iron out. the beautiful Japanese fabric was a gift from a Japanese friend. 

 From the ironing board you see my Viking every at the ready, and on the wall, my fabric rack that my son built for me. the floor lamp I bought at IKEA, it is small and can swing around to where I need it. The table my machine sits on also doubles as my cutting table. It is a Rubbermaid utility table. I have been research different cutting table solutions, as this is really too low for me to cut at. It is my wish to really trick out my studio when we are able to move. I want a tall cutting table!

The stash. These are 2 small bookshelves I got at Target many years ago. We once used them in our living room and when that changed, I could get rid of them. At first they were sufficient, but now I need a better storage solution. I really do not think my stash is too large. My Mom has much more in hers, well, yeah, she has been at this quilting much longer than me! LOL!

Now you see my Design Wall. I bought white flannel-backed vinyl tablecloth material (available in 54" width) and tacked it to the wall. The flannel side is out. Enough to cover this wall (about 8 foot wide) was less than $10 and I can easily and cheaply replace it when it gets too linty. 

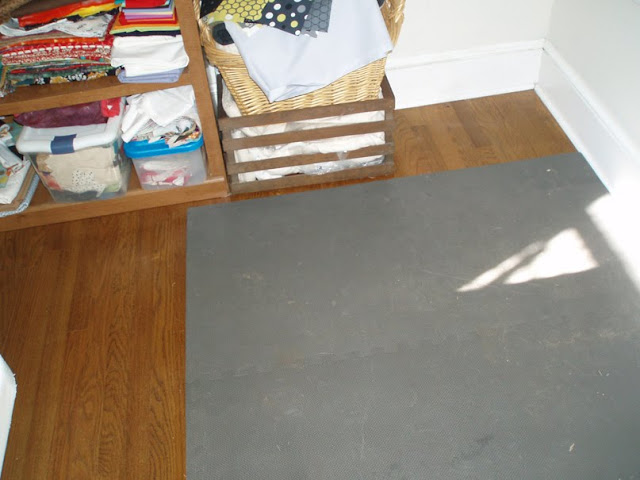
Last year I bought these bouncy rubber floor tiles from a big box home-improvement store. I like them to ease strain when I am standing and to cushion when I am pinning and cutting on the floor. These cam 4 to a pack for about $18 and I bought 2 packs. 

Thats my little haven. It is a small, 10' x 10' room, but I enjoy the space.